Interested in generating passive income? Join our partnership program and receive a commission on each new client referral. Learn more.
10 min read
How to Create CI/CD Pipeline for Your Laravel Project With Github Actions
This article provides a detailed guide for setting up a simple CI/CD pipeline with Github Actions for your Laravel project.
However, let's start by getting familiar with what continuous integration and continuous deployment pipelines are all about.
(if you are already familiar with the concepts, you can head straight to the guide below)
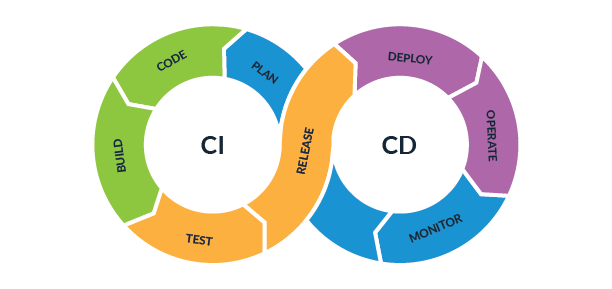
What is CI?
CI stands for Continuous Integration. It's an automated approach for continuously integrating software development updates with the codebase. It automates the source code's building, linting, and testing to ensure its validity. Using CI, development teams can discover errors and security problems more quickly and efficiently. Bugs are easier and cheaper to fix in the earlier stage.
Continuous integration places high importance on testing automation to ensure that the application works as expected when new commits are merged.
What is CD?
CD stands for continuous deployment. It's an automated approach for deploying the software to different environments like development, staging, and production. With continuous deployment, all the steps for deploying a new software version, like pulling the new codebase version from the source control, linting, testing, building, installing dependencies, running database migrations, etc., get fully automated.
Continuous deployment might also involve automation of infrastructure provisioning and environment setup and configuration.
Making the deployment process consistent, robust, and effortless allows development teams to deploy the updates frequently, which is probably the most important thing for ensuring the effective development of software products.
What is CI/CD Pipeline?

To implement Continuous Integration and Continuous Deployment for your project, you will need to set up pipelines. In simple terms, a pipeline consists of two main parts: a trigger event and a sequence of actions executed after the trigger event happens.
The trigger can be any event, like making a pull request, merging one branch into another, creating a new branch, or pushing a commit to the repository. If needed, you may also define custom trigger endpoints.
You can already see how executing a particular sequence of actions can be helpful after those kinds of trigger events. For example, you might need to run a test suite, a linter, the build process, the deployment process, send a notification on success or failure, etc. You can fully automate all of that once you implement CI and CD pipelines.
Several tools help us to set up pipelines with their triggers and sequences. Some examples are Jenkins, Github Actions, and Gitlab CI/CD. Of course, there are many more, but let's concentrate on the ones provided by Github and Gitlab.
Because both host git repositories, Github Actions, and Gitlab CI/CD natively provide support for the git repository triggers. They are configurable with YML files, where you define the trigger events and describe pipeline actions in a declarative manner.
The CI/CD tools give options to select the environment the pipeline will run in. For example, you can choose the Ubuntu server, and the pipeline will be executed in an Ubuntu environment. This means that your pipeline can execute Ubuntu shell commands, e.g., 'docker build -t test-tag .' to build a docker image and 'docker push' to push it to the Docker registry.
With the Ubuntu server, you can do so much more. Besides building and testing the code, you can, for example, use AWS CLI to communicate with AWS for resource provisioning and configuration. So with the suitable trigger event and the environment, you can automate anything you do manually with the pipeline.
Now let's look at how you can set up a simple Continuous Deployment pipeline for your Laravel project with Github Actions.
Configuring a CI/CD pipeline with Github Actions for a Laravel project
Generating SSH key
Let's start with the SSH key. We have to enable GitHub to access our server. We can achieve this without the SSH key, but this way is safer and less complicated.
So let's get started.
First of all, we should indeed access the server ourselves through SSH:
ssh root@127.0.0.1Then we should create an SSH key with the following command:
ssh-keygenIt will ask you several questions here; however, you are recommended to choose default in each case.
This is the command which creates public and private SSH keys. But we will need a public one just yet. To see the latter, you should write the following command in the terminal:
cat ~/.ssh/id_rsa.pubYou should copy the output of the command and then execute the command:
sudo vim ~/.ssh/authorized_keysAdding SSHkeys on a GitHub
You should add previously created keys in several places on Github. Adding public keys to our profile goes as follows:
- Go to Settings
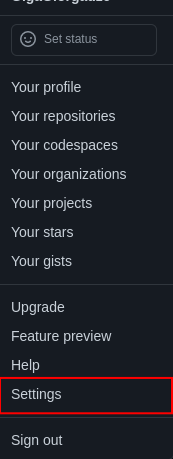
- Find SSH and GDP keys in the Settings
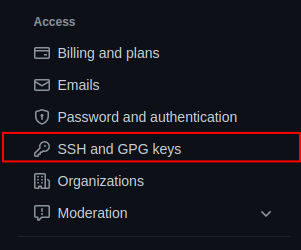
- Then add a new ssh key

- We should copy our public key by running cat ~/.ssh/id_rsa.pub and paste it here. The title field is not that important; however, try to make it clear. You might need to add multiple SSH keys in the future.

Now you should go to the repository where you want to set up CI/CD Pipeline.
Switch to the repository settings and find the Secrets tab.
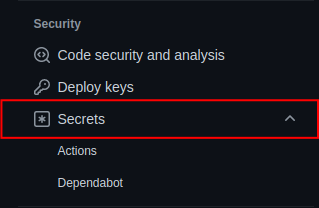
Add several repository secrets:
1) SSH_HOST, which will be our server IP address.
2) SSH_USERNAME, our username (one that we use in the SSH command).
3) SSH_KEY, which is our private key (do not paste it anywhere else!); You can access your private SSH key by running this command:
cat ~/.ssh/id_rsaThen copy the entire output of that command.
Configuring CD pipeline
And now, it’s time to configure the CD pipeline.
Create two folders in the project: First, create it in the .github project route and put the workflows in the .github. Next, you should create a file in workflows. (name is not important). So let’s create the yml file called deploy.yml.
![]()
Github workflow deploy
Write the following configuration in this file:
name: test and deploy

on:
  push:
    branches: [main]
jobs:
  deploy:
    runs-on: ubuntu-latest
    steps:
      - uses: shivammathur/setup-php@v2
        with:
          php-version: "8.4"
      - uses: actions/checkout@v4
      - uses: actions/setup-node@v4
        with:
          node-version: 22
      - uses: mirromutth/mysql-action@v1.1
        with:
          mysql database: testing
          mysql user: testing_user
          mysql password: super_secret
      - name: setup environment variables
        run: |
          cp .env.example .env
          echo "APP_ENV=testing" >> .env
          echo "DB_CONNECTION=mysql" >> .env
          echo "DB_USERNAME=testing_user" >> .env
          echo "DB_PASSWORD=super_secret" >> .env
          echo "DB_DATABASE=testing" >> .env
      - name: Install composer Dependencies
        run: composer install -q --no-ansi --no-interaction --no-scripts --no-progress --prefer-dist
      - name: Install node dependencies
        run: npm ci
      - name: build npm and generate key
        run: |
          php artisan key:generate
          npm run build
      - name: Directory Permissions
        run: chmod 755 -R storage bootstrap/cache
      - name: Run Unit tests
        run: php artisan test
      - name: Deploy to Server
        if: ${{ success() }}
        uses: appleboy/ssh-action@1.2.1
        with:
           host: ${{ secrets.SSH_HOST }}
           username: ${{ secrets.SSH_USERNAME }}
           key: ${{ secrets.SSH_KEY }}
           script_stop: true
           script: |
             cd apps/laravel
             php artisan down
             git pull
             npm ci
             npm run build
             composer i --no-interaction -q --no-progress
             php artisan migrate --force
             php artisan optimize
             php artisan up
If you use Laravel Mix instead of Vite, you should replace the *npm run build* with the *npm run prod*
So let’s explain the process in following sections:
First, the event that triggers the Github Actions workflow is declared here.
on:
    push:
        branches: [main]
In this case, the Github Actions workflow will run on the main branch on any push(commit, merge, etc...) event.
runs-on: ubuntu-latestWe specify which operating system should be set up inside the Docker container that runs our GitHub Actions workflow.
This part of the workflow is responsible for testing our project.
   steps:
     - uses: shivammathur/setup-php@v2
       with:
         php-version: "8.4"
     - uses: actions/checkout@v4
     - uses: actions/setup-node@v4
       with:
         node-version: 22
     - uses: mirromutth/mysql-action@v1.1
       with:
         mysql database: testing
         mysql user: testing_user
         mysql password: super_secret
     - name: setup environment variables
       run: |
         cp .env.example .env
         echo "APP_ENV=testing" >> .env
         echo "DB_CONNECTION=mysql" >> .env
         echo "DB_USERNAME=testing_user" >> .env
         echo "DB_PASSWORD=super_secret" >> .env
         echo "DB_DATABASE=testing" >> .env
     - name: Install composer Dependencies
       run: composer install -q --no-ansi --no-interaction --no-scripts --no-progress --prefer-dist
     - name: Install node dependencies
       run: npm ci
     - name: build npm and generate key
       run: |
         php artisan key:generate
         npm run build
     - name: Directory Permissions
       run: chmod 755 -R storage bootstrap/cache
     - name: Run Unit tests
       run: php artisan test
First, we use a few helping tools:
- shivammathur/setup-php@v2 which installs PHP inside the container
- actions/checkout@v4, which clones our project inside a container
- actions/setup-node@v4, which installs Node inside the container
- mirromutth/mysql-action@v1.1, which installs and configures the MySQL database inside the container.
Next, we declare which commands should run to:
- Copy .env.example file and update necessary keys for testing.
- Install composer packages.
- create project key and compile assets.
- Enable laravel to create files in bootstrap/cache, read and delete.
- Change laravel .env in order to use the current MySQL database with the correct credentials
- And at last, we indeed php artisan test to run our tests.
After the testing, the next step is the deployment:
- name: Deploy to Server
  if: ${{ success() }}
  uses: appleboy/ssh-action@1.2.1
  with:
     host: ${{ secrets.SSH_HOST }}
     username: ${{ secrets.SSH_USERNAME }}
     key: ${{ secrets.SSH_KEY }}
     script_stop: true
     script: |
       cd apps/laravel
       php artisan down
       git pull
       npm ci
       npm run build
       composer i --no-interaction -q --no-progress
       php artisan migrate --force
       php artisan optimize
       php artisan up
First, we make sure that our changes won’t be deployed if the test suite fails. We achieve this by using the following if statement:
if: ${{ success() }}This ensures that the deployment only proceeds if all tests pass successfully.
Next, we use appleboy/ssh-action@1.2.1 github action to ssh into the server using our password and run following steps to update code on our server:
Here’s what happens step by step:
- Navigate to the application folder (
cdinto it). - Enable maintenance mode to prevent user disruptions.
- Run
npm cito install dependencies cleanly. - Build frontend assets with
npm run build. - Run
composer installto install any new PHP dependencies. - Apply database migrations (
php artisan migrate --force) to avoid interactive confirmations. - Optimize the application by caching views, routes, and configurations (
php artisan optimize). - Disable maintenance mode to bring the application back online.
These steps cover a standard Laravel deployment, but you can adjust them based on your project’s needs.
Once everything is set up, push the updated deploy.yml file to GitHub. If all goes well, GitHub Actions will trigger the workflow, and your changes will be reflected on the server.
If that happens - congratulations! 🎉
If something goes wrong in the workflow, GitHub will notify you via email. You can also check the status directly in your repository:
- Go to GitHub Repository → Actions Tab.
- View all workflows and check for any failures.
- Click on a failed workflow to see detailed logs.
For example, this workflow failed because we did not insert a public key on our profile.

No public key error
Once you fix this (by adding the public key), you can rerun the deployment by clicking the "Re-run" button.

Deploy Failed
That’s it. I hope you found this guide helpful.
Written by Tornike Khachidze & Giga Giorgadze

Meet the authors
We are a 200+ people agency and provide product design, software development, and creative growth marketing services to companies ranging from fresh startups to established enterprises. Our work has earned us 100+ international awards, partnerships with Laravel, Vue, Meta, and Google, and the title of Georgia’s agency of the year in 2019 and 2021.

.webp&w=1920&q=75&dpl=dpl_6fFrZ1Vo4yAss5y58d9qcMHVsKyy)

