Interested in generating passive income? Join our partnership program and receive a commission on each new client referral. Learn more.
6 min read
Pest 4 in Action: Our Experience with the Latest Release
At Laracon US 2025, Nuno Maduro officially introduced Pest 4. Since then, the testing community has been looking forward to what this new version would bring. Now that it’s here, we had the chance to try it out ourselves and explore the improvements and new features it offers.
In this article, we’ll walk through our first impressions and share what stood out during our experience with Pest 4.
Core Enhancements in Pest 4
Here’s a quick summary of Pest 4’s standout enhancements that really caught our attention. While Pest 4 introduces a wide range of new features, these four stood out as especially useful and exciting:
- Browser Testing - Seamlessly test frontend interactions.
- Test Sharding - Split your test suite into parallel shards to speed up execution.
- Snapshot Testing - Easily check for visual regressions in your UI.
- Smoke Testing - Quickly verify core functionality before running full suites.
Browser Testing
Pest 4 now integrates Playwright, bringing end-to-end browser testing directly into your Laravel applications. This means you can write tests that feel like traditional unit tests - simple, readable, and expressive - but run them in a real browser environment.
With this integration, you can simulate user interactions such as clicking buttons, filling forms, navigating pages, or even checking dynamic content updates. The beauty of Pest’s approach is that you don’t need separate testing frameworks for your frontend and backend anymore - everything lives in a single, cohesive test suite.
Example:
<?php


it('logs in successfully', function () {
   $page = visit('/');


   $page->type('username', 'testuser@example.com')
   	  ->type('password', 'password123')
   	  ->press('login')
   	  ->assertSee('Dashboard');
});
This makes tests easier to read, maintain, and debug, and ensures that your application behaves as expected from the user’s perspective. For developers who have used Playwright before, the syntax will feel familiar, but Pest adds the elegance and simplicity of the Laravel ecosystem.
We tested Pest ourselves and found that integrating end-to-end tests directly into Pest 4 reduced the friction of testing UI interactions and made the whole workflow much smoother.
Pest Browser Testing vs Playwright
While Playwright is a powerful tool for browser automation, Pest 4’s browser testing adds significant advantages, especially for Laravel developers.
Deep Laravel Integration – Pest understands the Laravel environment, letting you interact directly with Laravel-specific features while testing. You can easily assert whether events are dispatched, emails are sent, notifications triggered, and more - something plain Playwright cannot do.
For example, here’s how you can test user login with event assertions in Pest:
it('may sign in the user', function () {
   Event::fake();


   $user = User::factory()->create([
  'email' => 'nuno@laravel.com',
       'password' => 'password',
   ]);


   $page = visit('/')->on()->mobile()->firefox();


   $page->click('Sign In')
       ->assertUrlIs('/login')
       ->assertSee('Sign In to Your Account')
       ->fill('email',$user->email)
       ->fill('password',$user->password)
       ->click('Submit')
       ->assertSee('Dashboard')


   $this->assertAuthenticated();


   Event::assertDispatched(UserLoggedIn::class);
});
Pest vs Playwright - Code Comparison
The most obvious difference is language: Pest 4 uses PHP, while Playwright requires JavaScript/TypeScript. For Laravel back-end developers already working in PHP, Pest often feels more natural and immediately preferable.
But the real distinction shows up in the code. With Pest, you can:
- Create a fake user directly within your test.
- Assert that Laravel has authenticated the user.
- Verify that the UserLoggedIn event was dispatched.
Playwright, on the other hand, doesn’t offer these Laravel-specific checks - it focuses purely on browser automation. You can only test what happens inside the browser, without insight into Laravel’s internals.
Yet notice this: the code size in both examples looks almost the same. This highlights how Pest provides deeper Laravel integration with less effort, while Playwright remains a powerful but framework-agnostic tool.
import { test, expect } from '@playwright/test';


test('may sign in the user', async ({ page }) => {
   await page.goto('/');


   await page.click('text=Sign In');


   await expect(page).toHaveURL('/login');
   await page.waitForLoadState('domcontentloaded').click();
   await expect(page.locator('h1')).toContainText('Sign In to YourAccount');


   await page.fill('input[name="email"]', 'nuno@laravel.com');
   await page.fill('input[name="password"]', 'password');


   await page.getByRole('button', { name: Submit' }).click();
   await page.waitForLoadState('domcontentloaded').click();


   await expect(page).toHaveURL(/.*dashboard/);
   await expect(page.locator('body')).toContainText('Dashboard');
});
Test Sharding - High Performance
Test Sharding in Pest 4 lets you split your test suite into smaller shards and run them in parallel, dramatically speeding up large test suites. In the Laracon demo, a test suite that originally took 10 seconds was reduced to just 2 seconds. Even more impressive, they claim that one of their real projects with around 400 browser tests reportedly runs in only 20 seconds using sharding.
The Best thing about Test Sharding is that setting it up is simple, and it works seamlessly in CI environments. The main thing to watch out for is shared state between tests - make sure your tests are isolated to avoid conflicts.
Example:
# Run the first shard of 4
./vendor/bin/pest --shard=1/4


# Run the second shard of 4
./vendor/bin/pest --shard=2/4
Sharding is especially useful for projects with heavy end-to-end tests, as it helps keep CI pipelines fast and efficient without sacrificing coverage.
Snapshot Testing - Pixels Never Lie
Snapshot testing gives you the ability to assert UI changes at the pixel level, making it a powerful tool for catching unintended visual regressions. Pest provides two visual modes to review changes: Diff and Slider.
- Diff Mode highlights exactly what changed compared to the baseline.
- Slider Mode lets you swipe between the old and new states for a smooth comparison.
This feature not only ensures your UI stays consistent but also makes reviewing changes intuitive and satisfying. It’s perfect for projects where visual consistency is critical, and it integrates seamlessly with your existing Pest tests.
Slider mode: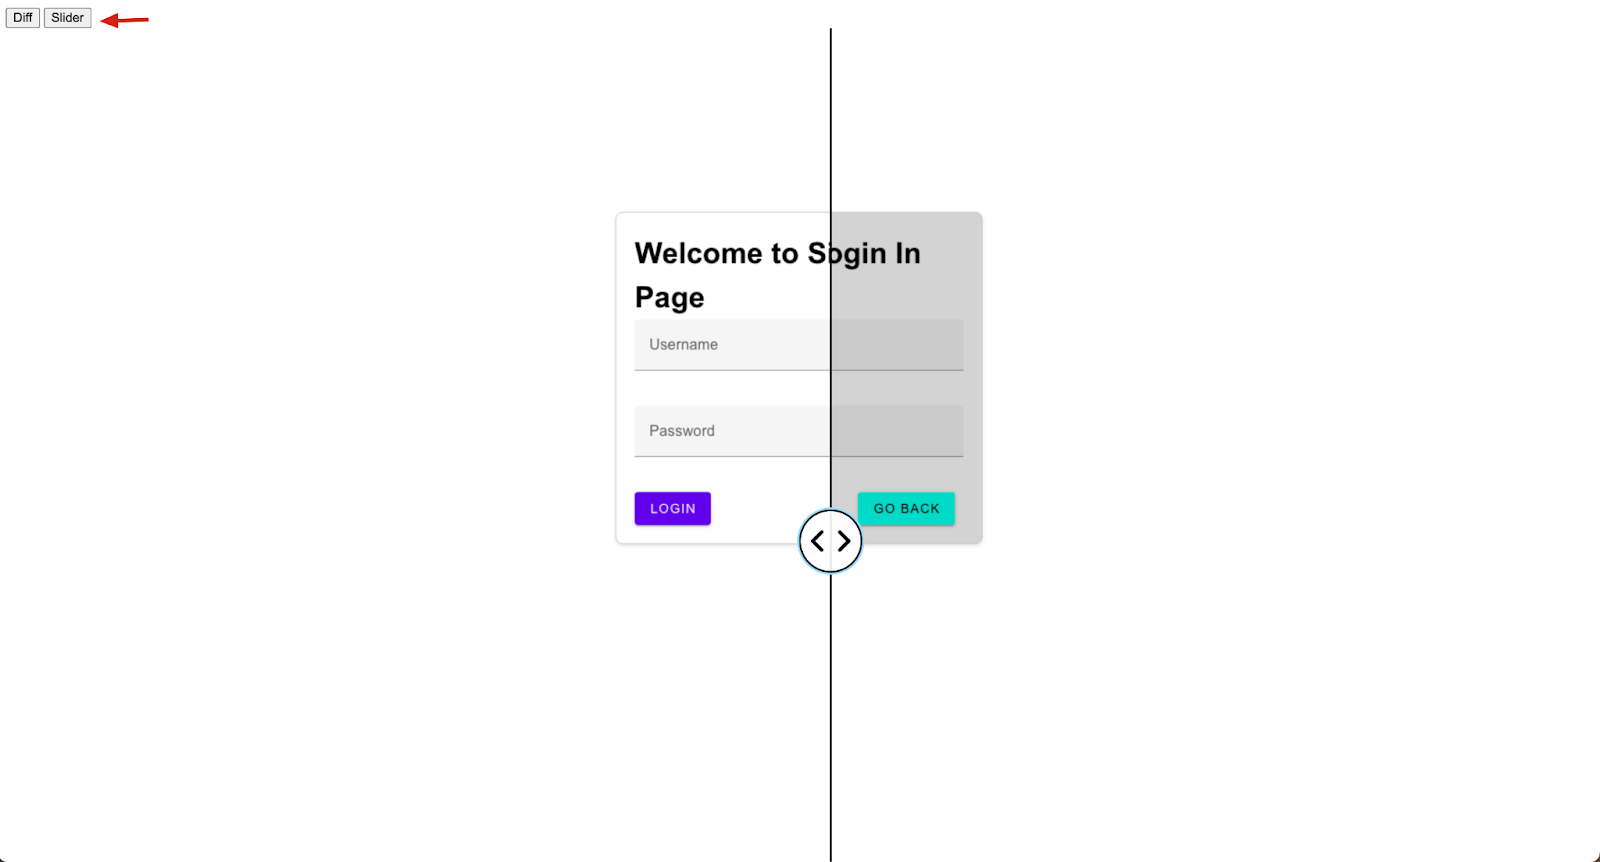
Diff mode: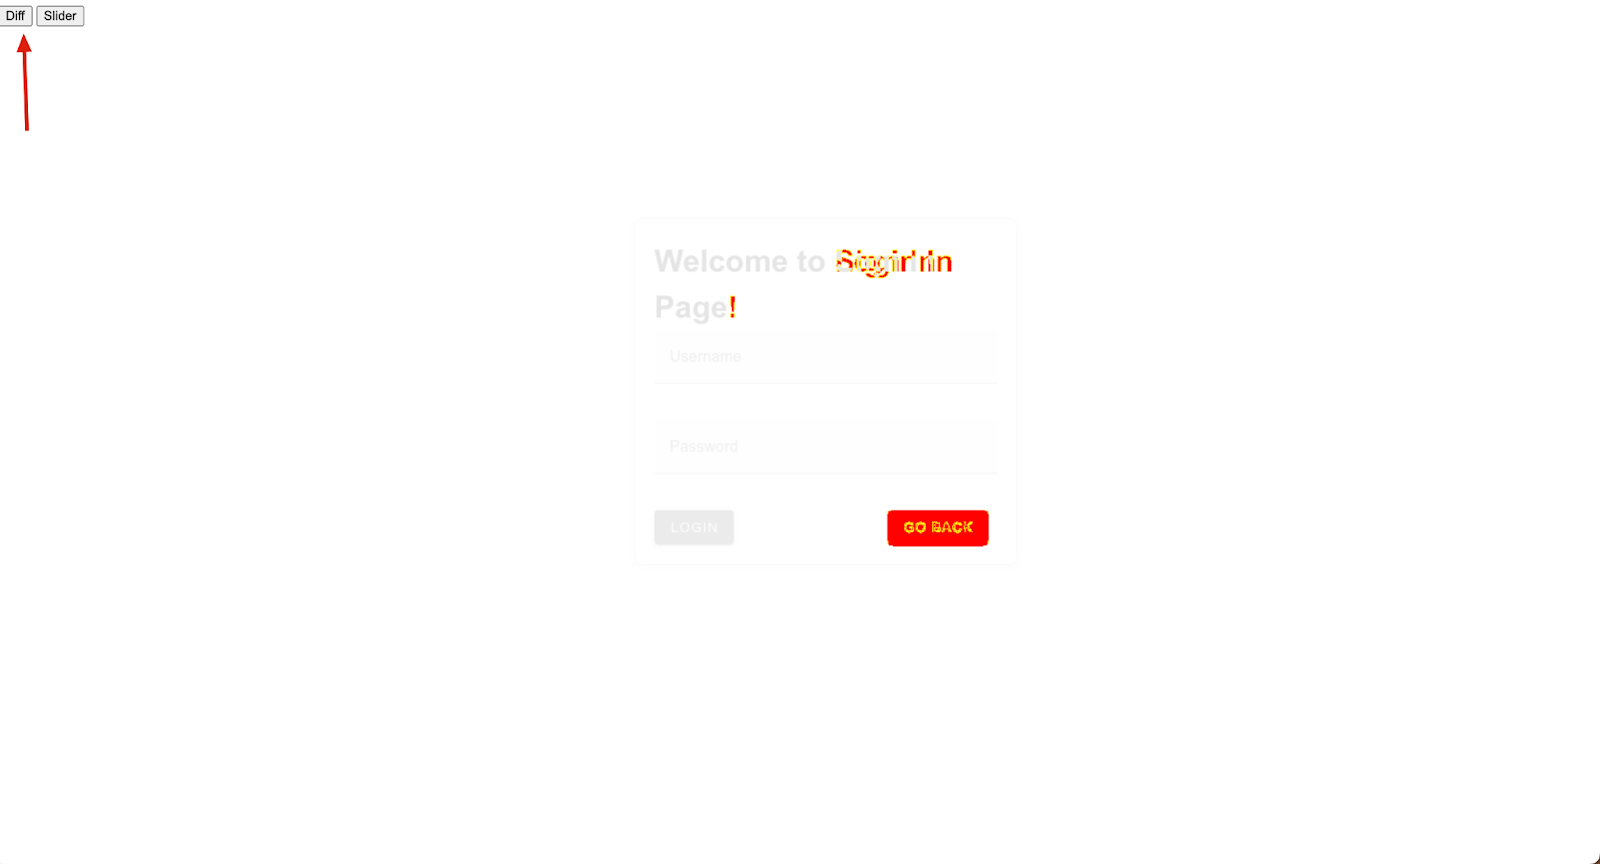
Smoke Testing - Quick & Effective
Implementing smoke testing in Pest 4 is incredibly simple - it literally takes just a couple of lines of code. With smoke tests, you can quickly verify that pages load successfully, there are no JavaScript errors during page load, and no lingering console logs in your codebase.
Based on our experience, implementing even this basic level of testing can make your application noticeably more stable, and it only takes a minute to set up.
<?php


it('has no smoke', function () {
   $routes = ['/', '/about', '/contact'];


   visit($routes)->assertNoSmoke();
});
Pest 4 brings a solid set of improvements that make testing faster, smoother, and more flexible. From browser testing to snapshot and smoke testing, the updates feel like natural steps forward for the framework. Of course, there’s much more packed into this release than we could cover here, so if you’d like to dive deeper into the details, be sure to check out the official Pest documentation.

Meet the authors
We are a 200+ people agency and provide product design, software development, and creative growth marketing services to companies ranging from fresh startups to established enterprises. Our work has earned us 100+ international awards, partnerships with Laravel, Vue, Meta, and Google, and the title of Georgia’s agency of the year in 2019 and 2021.

.webp&w=1920&q=75&dpl=dpl_6fFrZ1Vo4yAss5y58d9qcMHVsKyy)

